New and for a limited time this spring, we’re introducing 5 fresh colors that are the epitome of the warmer days ahead of us. Our Limited Edition Ultra Bright Springtime Pack of 8.5″ x 11″ cardstock papers are perfect for injecting a pop of color into your springtime crafts. Need a few ideas on how to utilize these gorgeous papers? Below are 5 easy DIY’s to kickstart your craftiness!
Peony Punch Out
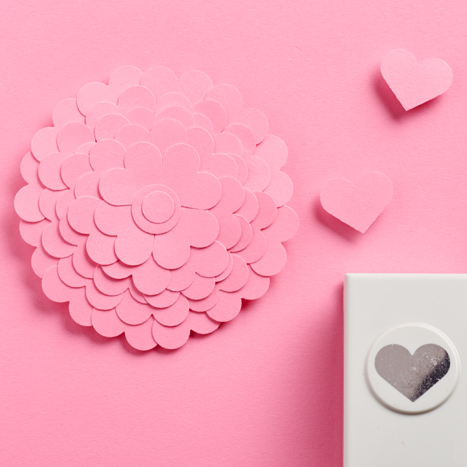
What You’ll Need
- A sheet of Peony from the Ultra Bright Springtime Pack
- 1″ Heart Punch
- 2.25″ Circle Punch
- Scotch Quick-Dry Adhesive
Directions
- Punch a 2.25″ circle out of the Peony paper to use as your base layer
- Punch out 41 hearts. These will be your petals
- Glue the tip of a heart onto the circular base. Glue another heart onto the circular base, slightly overlapping with the first heart. Repeat around the base until the circle is complete.
- Begin another layer on top of the first heart layer and repeat until the circle is complete
- Repeat building layers until satisfied with floral depth
Textured Tulip Card
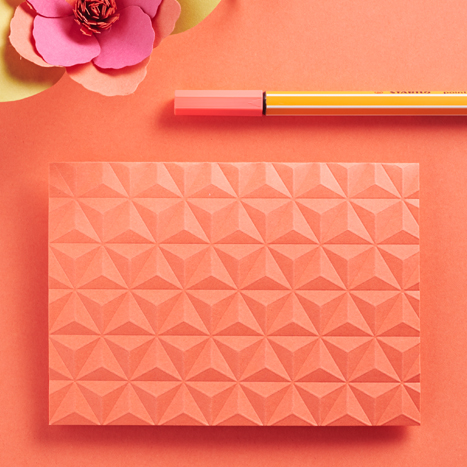
What You’ll Need
- A sheet of Tulip from the Ultra Bright Springtime Pack
- Evolution Crafting Tool
- Geometric Embossing Folder
Directions
- Trim down your piece of Tulip paper to desired card size
- Load the Evolution with Geometric Embossing Folder
- Follow directions with your Evolution Crafting Tool to properly emboss your Tulip card
Strung Stem Pennants
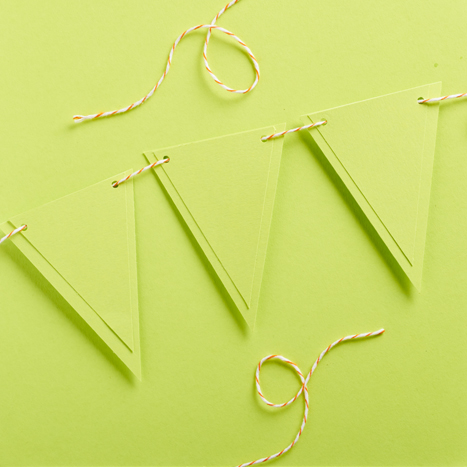
What You’ll Need
- A sheet of Stem from the Ultra Bright Springtime Pack
- Banner Punch Board
- iCraft Mini Tape Runner Dots
- Orange Twine from Spring Fling Baker’s Twine Set
Directions
- Follow the directions on the Banner Punch Board and trim banners to your desired size
- Follow the directions on the Banner Punch Board again to trim banners to a slightly smaller size to layer on top of the larger banners
- Adhere the smaller banner to the larger using your tape runner
- Using the Banner Punch Board’s hole punch, make two holes on each banner and string the baker’s twine through
Grass Green Greetings

What You’ll Need
- A sheet of Grass Green from the Ultra Bright Springtime Pack
- Xyron 150 Create a Sticker
- Hello Brush Rubber Stamp
- Quickie Glue Pen
- Lime Pastel ColorBox Chalk Inkpad
- Limeade glitter from the Iridescent Fine Glitter Set
- Foam Squares
- Ruler
- Scissors
Directions
- Trim your sheet of Grass Green down to desired greeting card size
- Once folded, run your card through the Xyron Sticker Maker
- Peel off the Xyron plastic to expose the adhesive on the front of your card and sprinkle the Limeade glitter over it, dispersing a coat of glitter evenly on top
- Tap extra glitter off the card onto an extra sheet of paper to pour back into the Limeade bottle
- Measure and trim a smaller, flat piece of Grass Green paper to fit on top of the glitter card with a .5″ border
- Ink the Hello Brush stamp in the Lime Pastel Inkpad and position where you please on your smaller piece of Grass Green paper
- Once dry, trace the Hello imprint you just made with the Quickie glue pen and cover with Limeade Glitter
- Tap extra glitter off the writing onto an extra sheet of paper to pour back into the Limeade bottle
- Place an adhesive Foam Square on the back 4 corners of the Hello paper and adhere to the top of the glitter card
Mint Embossing
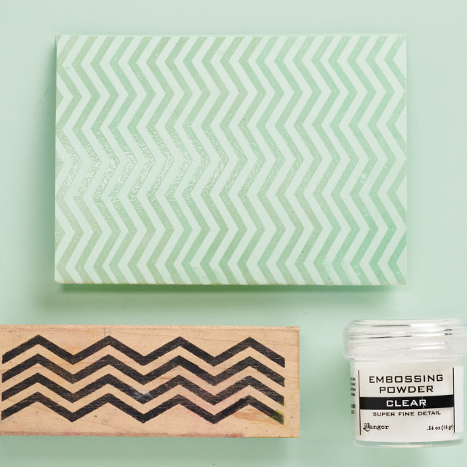
What You’ll Need
- A sheet of Mint from the Ultra Bright Springtime Pack
- Chevron Lines Rubber Stamp
- Ocean Colorbox Inkpad
- Clear Embossing Powder
- Embossing Heat Tool
- No Spill Tray Mate
Directions
- Trim your Mint paper down to the greeting card size you desire
- Ink the Chevron stamp in the Ocean Colorbox Inkpad and stamp the pattern across the card in the direction you prefer. Repeat stamping to create a cohesive pattern
- Cover the stamped area of your card with the Clear Embossing Powder
- Tap extra powder off into the No Spill Tray Mate
- Using your heat embosser, gently emboss the chevron design


