Each year we look for meaningful ways to thank our moms for bringing us into this world. One of the most special ways to show gratitude is with a thoughtful, handmade gift. This year, our in-house crafting expert, Rebecca, created a memory box for her mom to thank her. Memory boxes make a lovely gift for a variety of occasions beyond Mother’s Day, such as graduation and first anniversaries – or are even a great way to put together an inspiration board for yourself! Create your own with these how-to steps and share your box with us on Instagram with the hashtag #PSThanksMom.
How to make your own memory box
1. Pick a Theme
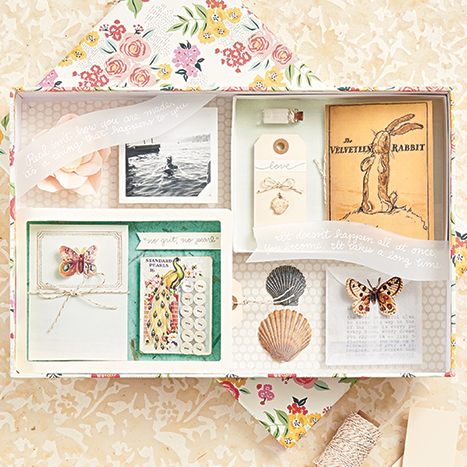
Having a theme can help you envision your box more clearly. Rebecca says, “A book my mom read to me often when I was young was The Velveteen Rabbit. Words I hold onto from this story are ‘Real isn’t how you are made, it’s a thing that happens to you. It doesn’t happen all at once, you become. It takes a long time.‘ I decided to make my mom a box thanking her for helping me ‘to become’ and I wrote that quote on vellum banners and mounted them inside the box.”
You can make your theme anything you want! Some ideas include: What I admire about you, Favorite memories together or Lessons in life I learned from you.
2. Gather your materials
Here are some of the essentials you will need to create your box.
- Shirt Box
- A7 Mailer Box – to create sections
- Twine – to accent tags, bind booklets, attach keepsakes, etc
- Tags – to label sections and write messages
- Glassine or baby envelopes – perfect for holding keepsakes or folded letters
- Assorted Decorative Paper – for a decorative background in each section of your box
- Foam Squares – this dimensional adhesive will give a little pop to items you adhere
- Super Tape – for an ultra-strong hold for heavier items
- Double-sided Tape
- Assorted stamps, inks, pens, etc – for messages and handmade embellishment
- Memorabilia:
- Photos
- Ephemera: letters, tickets, maps, drawings, book pages, etc
- Keepsakes/trinkets: seashells, lockets, handkerchiefs, buttons, figurines, coins, etc. Keep them small!
TIPS:
- For a more interesting memory box, it helps to have a mix of flat and dimensional items. While things like photos and ticket stubs may be easier to find, try to come up with 1 or 2 dimensional items if possible.
- Once you’ve finished collecting items, you can fill in the blanks with handwritten messages, photocopies of sentimental items, etc.
3. Get Creative!
- Arrange all the items in the box
- Create sections with smaller boxes. We used 1 A7 mailer box to create four sections. The lid and the base each became a section and the negative space around them created 2 more sections.
- Line the sections with decorative paper.
- Fill each section with photos, trinkets, messages, etc.
- Fill in with your handmade touches (how-to’s for booklets and pop-out messages below)
- Once you have everything arranged just so, adhere everything.
TIPS:
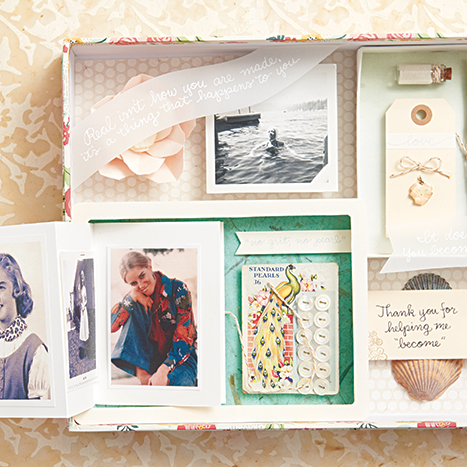
- Sometimes it helps to give each section a theme so that they help to tell a story. Since Rebecca’s box was a way of thanking her mom for helping her to become, she thought of some of the ways her mom did this and tried to pick items and create arrangements that illustrated each way. You can add banners or tags to label the sections if you like!
- Create different levels in your sections by adding layers of foam core under the boxes.
- Use the frame punch board to create frames for different sections.
Make it Interactive:
Add little surprises for your mom to discover as she explores her memory box for the first time. Here are a few ways to do it:
- Tuck items into baby envelopes or glassine envelopes for her to open.
- Make little booklets and fill them with photos or memories. (see how-tos below)
- Tuck hidden messages in the layers. (see how-to below)
Pamphlet Booklet How-To:
- Determine your finished booklet size.
- Cut paper for the pages and cover – they should be the same height and double the width of the finished booklet size.
- Fold all the paper in half and nest all the pages within the cover.
- Staple along the centerfold – or pierce 2 holes and tie them together with twine.
- Decorate the cover and fill in the pages as desired.
Accordion Booklet How-To:
- Determine your finished booklet size.
- Cut long strips of paper – the short end of the strips should be the height of your finished booklet.
- Accordion fold the strip – the space between each fold should be the width of your finished booklet.
- If needed, you can adhere strips together to add more pages to your accordion book.
- Decorate the front of the book and adhere a piece of twine to the back.
- Fill in the pages as desired.
- Mount the back of the book to the box, wrap the twine around the front and tie a bow.
Tuck Hidden Messages in the Layers:
- Boost one of your A7 mailer boxes off the bottom of the shirt box with strips of foam core.
- Stick a small envelope on the bottom of the mailer box in the negative space between the strips of foam core with the opening in the envelope lined up with the edge of the box.
- Write a message on a tag and tie some twine on one end. Feed the other end into the hidden envelope – it’s a surprise message!
There is no right or wrong way to make your own keepsake box – have fun with it, get creative and the recipient will adore each thoughtful piece.
Rebecca is our in-house crafting expert who has been dreaming up fun crafts at Paper Source for the past 5 years! As Director of Workshops, she is constantly reimagining DIY elements into new ideas and classes just for you. Check out our latest workshops for more DIY opportunities!


I love this idea! But I would love to see larger versions of these example pictures. 🙂 Is it possible to make the images clickable so we can see them better/larger? I tried to simply zoom in, but the image loses its clarity when I do that.
Thank you!
Hi Lexy, thank you for your feedback! We don’t have additional images at the moment but will definitely keep this in mind for future posts.
[…] customized gift to express your love and gratitude to the most important woman in your life, this DIY is your […]