We welcome one of our newest crafting accessories: clear cellophane bags! Though the product itself is really basic (how exciting can clear bags be?), there are literally hundreds of ways you can fill and decorate these handy food-safe bags. Here a few easy gift wrapping ideas, perfect for the upcoming holiday season!
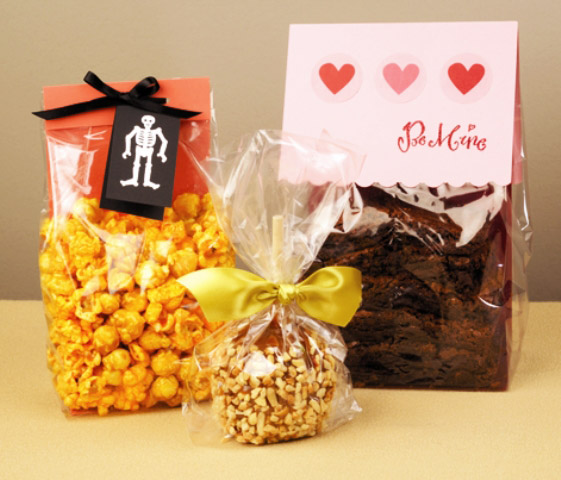
Halloween Goodie Bags
What you might need: Papaya #10 Folded Backing • Small Cellophane Bag • Bone Folder • Metal Ruler or Straightedge • Black 1/4″ Satin Ribbon • Scrap Paper • Skeleton Rubber Stamp • White Colorbox Inkpad • Opaque White Embossing Powder • Heat Embossing Tool • 1/8″ Hole Punch
1. To create the skeleton tag, cut a piece of scrap paper to your desired size (I cut a 1 1/2” x 6” piece, which folds in half to create a 1 1/2” x 3” tag). Stamp the skeleton with the White Colorbox Inkpad, sprinkle with Opaque White Embossing Powder, shake off the excess, then heat emboss. Punch a hole in the top corner of the tag to attach to the bag with ribbon.
2. The #10 folded backing becomes a colorful liner for the cellophane bag. To do this, use a bone folder to score the backing card 2″ from the bottom, then fold to make an “L” shape. Insert the backing into the bag – the short folded portion will line the inside bottom of the bag, and the long portion will line the inside back of the bag. Make sure to place the backing against the back seam of the cellophane bag so the seam doesn’t show from the front.
3. Fill the bag with goodies!
4. Fold the top pre-scored portion of the backing card down over the top of the bag to close. Use a 1/8″ hole punch to punch holes through the bag itself where it intersects with the pre-punched holes in the card.
5. Feed 1/4″ Satin Ribbon through the holes and knot in the front. Before tying a bow, string the skeleton tag through the ribbon to attach.
That’s it, so easy! If you’re making several goodie bags, remember that it’s always easiest to work assembly-line style. So score and fold all of your #10 folded backings first, then cut all of the ribbon, then create all of your tags, and so on.
Valentine Goodie Bags
This lovely bag doubles as a Valentine’s Day card and a special gift! If you’re sharing home-baked treats, think about including the recipe with the gift. You can slip a recipe card in the back of the bag before closing, or attach it to the card itself.
What you might need: Blossom A2 Folded Card • 4bar Flat Card • Medium Cellophane Bag • Metal Ruler or Straightedge • Exacto Knife or Paper Trimmer • Scallop-edge Decorative Scissors • Sweetheart Stickers • Be Mine Rubber Stamp • Cherry Twinkle Embossing Powder • Ruby Colorbox Inkpad • Heat Embossing Tool • Double-sided Tape • Stapler
1. Lining the inside bottom of the cellophane bag with a note card will create a stiff, flat surface. Trim a 4bar flat card to 3″ x 4.875″ and place into the bottom of the bag.
2. Stack brownies or bar cookies inside the bag.
3. Fold the top of the bag down once to close, and staple to secure.
4. Use the Scallop-edge Scissors to trim the bottom of an A2 folded card, and decorate with Sweetheart Stickers.
5. Rubber stamp your message onto the front of the folded card, sprinkle with Cherry Twinkle Embossing Powder, shake off excess, then heat emboss.
6. Attach a small strip of double-sided tape to both the inside bottom edges of the folded card, and carefully position the card over the top of the closed bag. Press to seal and attach to the bag.

Kids Candy Favor Bags
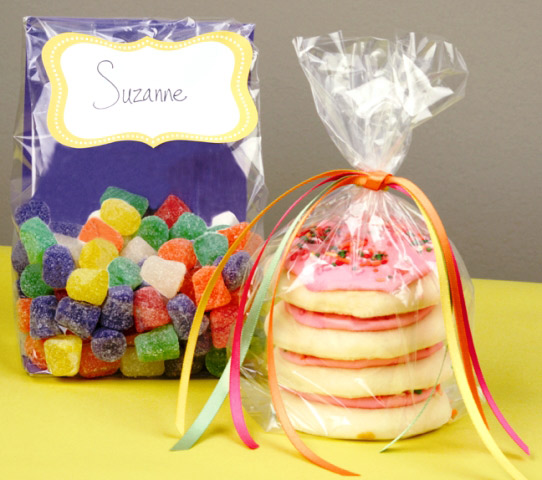
These goodie bags make super festive and easy party favors for a kids birthday party! They can also be used as placecards since they can be personalized with the name of each guest.
What you might need: Grape 8.5″ x 11″ Cover Weight Paper • Metal Straightedge or Ruler • Exacto Knife or Paper Trimmer • Medium Cellophane Bag • Curry Dots Bracket Labels
1. To create the liner for the cellophane bag, trim the cover weight paper down to 5″ x 11″, and use a bone folder to score 3″ from the bottom. Fold the card into an “L” shape and insert into the bag, covering the inside bottom and back of the bag to hide the bag’s seam.
2. Fill the bag with goodies!
3. Write each guests’ name onto a label.
4. Fold the top of your bag down over the top of the paper lining, and seal with a label.

Warm Wishes Mug
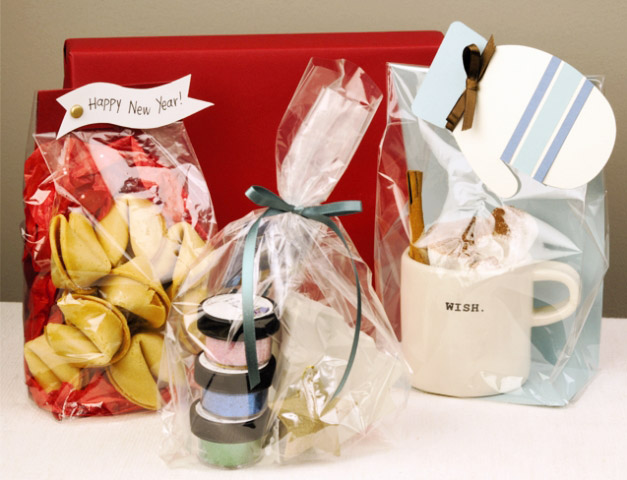
This gift bag is sure to warm anyone’s heart. Fill a mug with packets of cocoa or tea… or better yet, blend your own mix (you can find lots of yummy recipes online). Top with a few confectioners’ marshmallows and cinnamon sticks, then place inside the bag after lining with a colored paper backing. A mitten shape card becomes a festive gift tag, embellished with satin ribbon stripes and bow.
Holiday Craft Kit Bag
Goodie bags don’t just have to be filled with food. This craft kit bag makes a wonderful party favor or gift for kids around the holidays. The best part is the goodies inside will keep them entertained for hours, and they’ll have their own work of art to take home! Fill a cellophane bag with assorted crafting supplies: small craft boxes, assorted cards & envelopes, stickers and labels, glitter, and adhesives (Zots, glue pens, etc.).
–Alanna
PS colors: gravel & plum
Latest fave: 2010 Paper Source Wall Art Calendar


very cute. there are tons of uses for these bags, especially with all the holidays coming up!
Aw that mug & mitten set is soooo cute. I love these ideas!
I was wondering if you can decorate clear cello treat bags with confetti using a hot glue gun?