Hopping down the bunny trail looking for just the right springtime sentiment? Surprise somebunny special with this adorable DIY card!
To create this perfectly precious card, simply gather the supplies you need and follow these easy steps:
Hoppy Easter Card
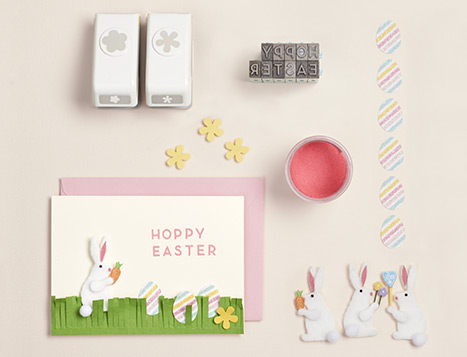
- Lay your card out on your crafting table. We used Superfine White, but feel free to let your imagination run wild with any of the colors in our collection. Lighter-colored paper allows your adornments to hop right off the front!
- Collect the letters you need to spell out an Easter message (we’re wishing you a “Hoppy Easter”) with your PEGZ Stackable Letter Set. Ink in your Versamark Watercolor Ink Pad and stamp on your card – anywhere you please.
- Sprinkle embossing powder over the stamp – we opted for Pink – and then shake the excess powder off into your No Spill Tray Mate (this makes cleanup a breeze). Dump the powder back in the jar to reuse on future projects.
- Use your Embossing Heat Tool on the powder to create a professional, dimensional look!
- Next, cut a short length of Clover paper the width of your card (about 4 7/8″) and about 1″ high. Make small slits down the length of the paper to create your dimensional grass!
Use Double-Sided Removable Tape to adhere the grass to the bottom edge of the card and trim the edges to fit.
- Pop a little puffy bunny or two into the grass, and attach glittery egg stickers close by to join them.
- Using your Mini Flower Punch, create little blooms out of Sunshine paper and decorate your garden scene to your heart’s delight!
- Superfine Soft White 4 Bar Flat Cards
- PEGZ Stackable Letter Set
- Versamark Watermark Ink Pad
- Pink Embossing Powder
- No Spill Tray Mate
- Embossing Heat Tool
- Clover 8.5 x 11 Printer Paper
- Double-Sided Removable Tape
- Fuzzy Bunny Stickers
- Egg Glitter Stickers
- Mini Flower Punch
- Sunshine 8.5 x 11 Printer Paper
What kind of springtime crafts have you created lately? Show them off at #PaperSource!
Share: