New and for a limited time this summer, we’re introducing a breezy summer hue! Our Limited Edition color, Lagoon, is perfect for summertime crafts that scream “aloha.” Need a few ideas on how to utilize this gorgeous color? Below are 4 easy DIY’s to kickstart your craftiness!
Splattered Stationery
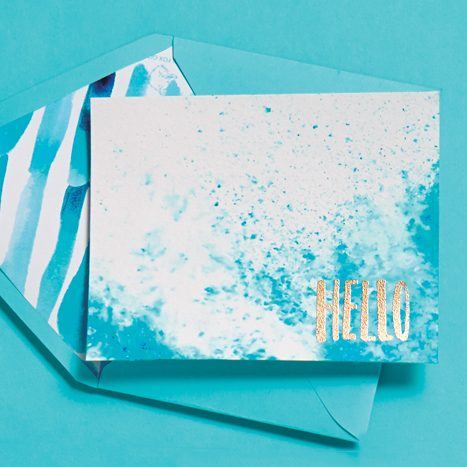
What You’ll Need
- A6 Savoy Flat Card
- Harbor Blue Pixie Paint
- Hello Brush Stroke Stamp
- Versamark Inkpad
- Heat Tool
- Gold Embossing Powder
- Envelope Liner Template Kit
- Blue Brush Strokes Wrapping Paper
- Memory Tape Runner
- A6 Lagoon Envelope
Directions
- Tap a small amount of pixie paint on the surface of your A6 Savoy card. Mist with water to activate the paint.
- Once dry, stamp “hello” with Versamark ink in the bottom right hand corner.
- Coat with gold embossing powder and emboss using the heat tool.
- Use the A6 envelope liner template to trace and cut a liner out of the Blue Brush Strokes wrap.
- Adhere the liner to the A6 Lagoon envelope with a tape runner.
Nautical Notecard
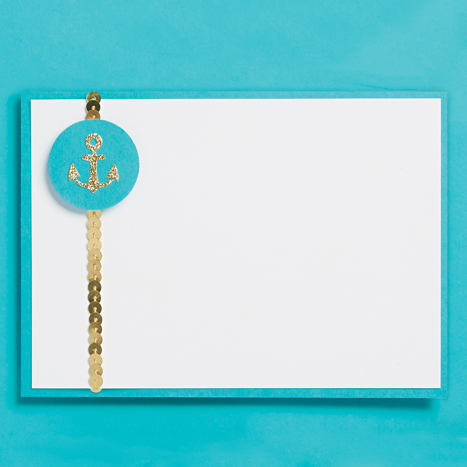
What You’ll Need
- A7 Lagoon Flat Card
- 8.5″ x 11″ Pure White Cardstock
- 1″ Gold Sequin Trim
- 1″ Circle Punch
- Gold Glitter Anchor Sticker
- Memory Tape Runner
- Foam Square Combo Pack
- Zots
Directions
- Trim a piece of the Pure White Cardstock to 4.75″ x 6.75″
- Cut a strip of sequin trim to roughly 5.5″ and wrap it around the front of the trimmed Pure White Cardstock (about 1″ in from the left edge) and adhere it to the back of the card with zots.
- Mount the trimmed Pure White Cardstock to the Lagoon A7 card with the tape runner.
- Punch a 1″ circle out of another Lagoon card and adhere an anchor sticker to the center of it.
- Attach the anchor circle, overlapping the sequin trim, with a foam square.
Punchy Pineapples
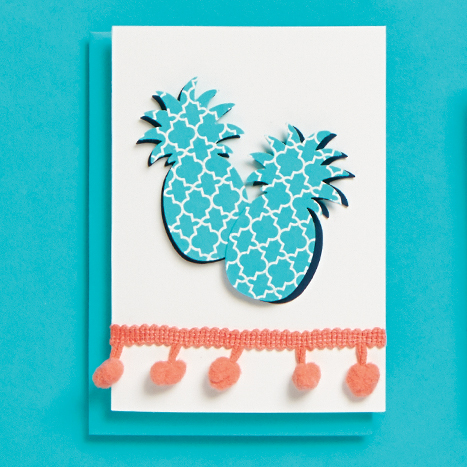
What You’ll Need
- Pure White 4 Bar Folded Card
- 8.5″ x 11″ Lagoon Cardstock
- 8.5″ x 11″ Night Cardstock
- Pink Pom Trim
- Lattice Stamp
- Versamark Inkpad
- White Embossing Powder
- Heat Tool
- Foam Squares Combo Pack
- 1/4″ Super Tacky Tape
- Pineapple Punch
- Xyron 150
- Lagoon 4 Bar Envelope
Directions
- Stamp lattice stamp on a piece of Lagoon Cardstock using the Versamark inkpad.
- Coat with white embossing powder and emboss with the heat tool.
- Punch 2 pineapples out of the stamped paper.
- Punch 2 pineapples out of the Night Cardstock
- Run the Night pineapples through the Xyron 150 to turn them into stickers and mount them to the center of the card, slightly overlapping.
- Adhere the Lagoon pineapples slightly askew over the top of the Night pineapples with foam squares.
- Attach the pink pom fringe to the bottom of the card with the 1/4″ Super Tacky Tape.
Aloha Aspirations
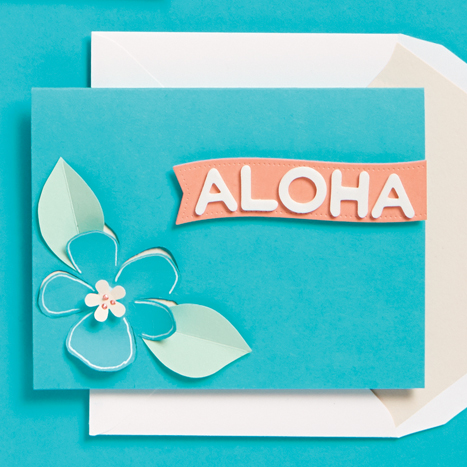
What You’ll Need
- Lagoon A2 Folded Card
- Pure White A2 Envelope
- 8.5″ x 11″ Luxe Blush Paper
- A2 Envelope Liner Template
- Memory Tape Runner
- Avery Elle Banner Die
- Evolution Crafting Machine
- White Alphabet Thickers
- White Uniball Pen
- Mini Flower Punch
- 8.5″ x 11″ Coral Cardstock
- Foam Squares Combo Pack
- Craft Knife
- Cutting Mat
- Liquid Pearls
- 8.5″ x 11″ Sage Cardstock
- Scissors
- Bone Folder
Directions
- Lightly draw a flower shape in the bottom left hand corner of the Lagoon A2 folded card.
- With the cutting mat placed underneath the card, cut the petal lines with the craft knife (don’t allow cuts to intersect in the middle so that all the petals stay attached).
- Accent the petals by outlining each one with the white uniball pen. Pull each petal away from the surface of the card slightly for dimension.
- Punch a mini flower out of the Luxe Blush paper. Add it to the center of the Lagoon flower with a foam square and add a few dots of liquid pearls to the center.
- Cut two leaf shapes out of the Sage Cardstock. Score them down the center with the Bone Folder and bend slightly at the crease to add depth.
- Cut a banner out of the Coral Cardstock with the banner die and the Evolution Machine.
- Adhere the white alphabet thickers to the banner to spell “aloha”
- Mount the banner to the card with foam squares and trim any excess hanging over the edge of the card.
- Trace and cut the envelope liner out of Luxe Blush Paper.
- Mount the Luxe Blush liner to the Pure White Envelope with the tape runner.


Hello! I love your products. I would love to design with you for Paper Source. I am a freelance illustrator. If you could give me a contact person or send me and email, that would be great! Thank you!