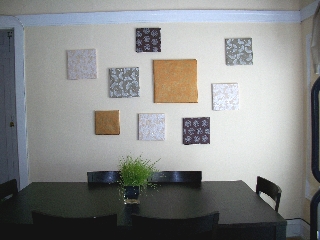
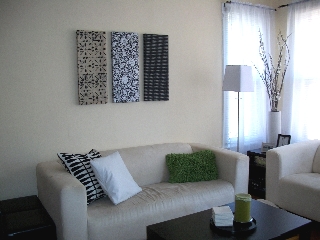
My dad is a pretty handy guy, and so growing up, I was always encouraged to build, tinker and create. I remember as a little kid I was always outside in the tool shed with dad (yep, I was a daddy’s girl!) while he was working. Sometimes he’d give me a piece of wood, a handful of nails and a small hammer, and there I’d sit, hammering nails into the wood, and then sometimes finishing off my “project” by stringing twine around the nails. Now, all grown up and living on my own, I still go to dad when I need help constructing items to decorate my living space. And, of course, since I work at Paper Source, I have to incorporate paper! This is my favorite home decorating trick: paper-covered wall art.
It’s a good idea to select your paper first, because that will affect how large your piece of art can be. For the base, all you need is a wood frame (this is where my dad helps!) Using scrap pieces of wood, he constructs a simple frame to the dimensions that I need. Canvas stretcher bars, which are quite inexpensive, also work well, and you can customize the size by choosing the lengths you buy. An old wooden frame without the glass/picture might also work. If you don’t have access to wood (or someone who can build the frame for you) you could also try old shoe boxes, shirt boxes, etc.
 Lay your paper face down, and then place the frame on top (also face down). Fold the paper up over the sides to see how much you need around the edges so the paper can reach to the back of the frame; then, trim your paper to fit. Next, starting on the center of each side, fold the paper up and around to the back of the frame, and staple in place with a mechanical stapler. Pull the paper pretty taught, so that there are no wrinkles or bubbles on the front. Work your way around, inching out towards the corners as you move around the frame, stapling the paper to the back of the frame. I usually place a staple every inch and a half or so.
And that’s it, so easy, so affordable! The best part is, if you want to change up your room a little bit, all you have to do is get some new paper and staple it right over the old! For me, this is so great, because we ALWAYS have new paper coming in that I love and want to use!
–Alanna
PS colors: gravel & plum
Latest fave: Faux Bois Soap Set


I love this! I buy your large pieces of paper and hang them in my home with your bamboo rods! LOVE LOVE
I did my entire office wall with your papers. It’s daily inspiration.
http://winterandconstruction.com/large_portfolio/office.html
This is one of those times when we say to ourselves…”now why didn’t I think of that!!!”
after months of shopping for wall art after repainting my living room, i framed and put up a $5 sheet of marbled Asian paper — it’s perfect.