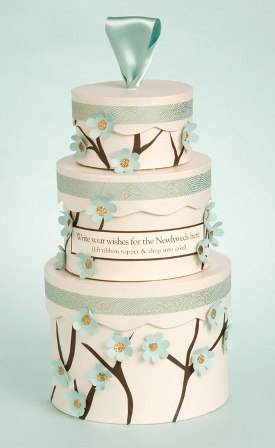
Brides are always looking for unique wedding ideas, and we think we have just the thing! This wedding cake wish box is the perfect addition to a wedding guest book table or to display on the way into the reception area. Guests can write well wishes onto small slips of paper, then open the lid of the wish box and drop them inside. What a treat it will be to open the wish box when you return from your honeymoon! A charming keepsake for you and your groom.
We used the three smallest Scallop Edge Kraft Boxes to make our wish box, which creates a cake that is about 9″ tall (excluding the ribbon loop) and 5 1/4″ in diameter. You can create a larger cake by stacking larger box sizes or even add more tiers. The boxes can be decorated in colors and patterns to match your wedding decor. A wish box also makes a wonderful bridal shower activity!
–Annie
PS colors: gravel & beet
Latest fave: Tree Trunk Tea Light and Japanese 8 1/4″ Scissors
Materials Needed:
How to PDF
Scallop Edge Kraft Box (extra small, small & medium)
7 Point Shape Hole Punch
Small Zots Dots
Glue Gun
Gold Glitter
Pool 1 1/2″ Satin Ribbon
Yuzen Pool Gold Waves Paper
8.5 x 11 Text Paper (pool, chocolate, superfine soft white)
Glue Stick
Xacto Knife
Scissors
Bone Folder
Pencil
Instructions:
1. The small (middle tier) and medium (bottom tier) boxes need to be cut to create the inside drop hole where your guests will place their wishes. The extra small box (top tier) will not be cut. To cut a hole in the lid of the medium box and the bottom of the small box, lightly trace the bottom of the small box with a pencil onto the lid of the medium box. With an xacto knife, cut a hole in the lid of the medium box approximately 1/2″ smaller than the traced outline. Then cut a hole in the bottom of the small box about 1/2″ smaller than the base of the box itself. These two holes should match up when you stack the boxes.
2. Create the ribbon topper by carefully cutting a hole, with an xacto knife, approximately 1/4″ in diameter into the center of the extra small box lid. Cut a 9″ length of ribbon, then tuck the ends of the ribbon into the hole leaving a loop above the lid. You don’t need to tie the ribbon ends – the tension of the ribbon inside the small hole is enough to keep it in place.
3. Print a banner measuring approximately 1″ x 5″ onto superfine soft white text paper. We’ve chosen the message: “Write your wishes for the Newlyweds here. {life the ribbon topper & drop into cake}”. Back this onto chocolate text paper with a 1/8″ border on all four sides.
4. Decorate each cake layer with branches by using the shape template in the How to PDF. Trace and cut the branch shapes from chocolate text paper. Cut to desired lengths and adhere to the boxes. Adhere banner in place. To create flowers, punch 7 point shape out of pool text paper and curl the petals up with bone folder. To add the glittered centers, stick a small zots dot in the center of each flower punch out, dip into gold glitter and tap off excess glitter back into container. Add the flowers to the branches with small zots dots. Add additional decorative flair with a 1/4″ band of Yuzen Pool Gold Waves fine paper around the scallop lids.
5. Once decorating is complete, you will adhere some of the box pieces together using a glue gun. Starting with the lower tiers, first glue the small box bottom (middle tier) to the center of the medium box lid (bottom tier). Then glue the extra small box bottom (top tier) to the center of the small box lid (middle tier). Lastly glue the extra small box lid to the extra small box bottom by adding a little glue to the inside rim of the lid.
When your guests pull the ribbon, they will remove the entire first tier and the lid of the middle tier revealing the drop hole. To collect your wishes, you can remove the lid of the bottom tier.


this is so adorable!
This is beautiful and so clever!
Thank you for sharing this with us.
beautiful
Oooooohhh Annie! This is WAYyyyyyyyy cute!
Awesome 😉 what a fantistic idea!
So ridiculously cute! I want! Almost wish I was getting married 🙂
thanx! i’ve made this cake for a sweet 16th birthday in fun, bright, colors and had guests write a funny comment of fact about the birthday girl. it was a riot! hope this sparks more ideas!
Oh I love this as a wedding cake idea! Might have to use it!
I love this SO much! Are the boxes painted?
Sarah – no, the boxes aren’t painted. They are vanilla craft boxes so they have a lovely creamy finish. You can decorate or paint them, but they’re also nice just as they are!
I can’t wait to make this for a wedding!
What a beautiful idea! It’s a perfect wedding present. I will have to make this for one of my girlfriends. This is why I love Papersource – the source for unique gifts.
I love this. It’s beautiful and classy!
I plan to organize an activity to make a few of these at a bachelorette party for a friend. Should be fun!
This is amazing! Love it!
Best of luck
Where could I find larger boxes for a bigger card box? 400 guests at the wedding.